
In this article, we will dive into the DreamHost in-depth review of their Shared Hosting offering.
If you are currently interested in hosting your website to DreamHost. Then this article might help you finally decide whether to go with them or not.
DreamHost is currently one the biggest players in the web hosting provider market.
WordPress.org even highly recommends them as your go to web hosting if you are planning to use WordPress.
Currently there are over 1.5 million+ websites under the DreamHost banner. And this number just keeps getting bigger by the moment.
DreamHost currently offers Shared Hosting, WordPress Hosting, VPS Hosting, Cloud Hosting and Dedicated Hosting on their website.
You can also buy a domain straight from them if you need to.
Now let us dive into my in-depth review of their Shared Hosting plans.
Here is my DreamHost in-depth review – Shared Hosting edition.
1. Pricing
The first part we will look into is their pricing.
Like any other hosting. DreamHost also offers lower monthly pricing if you decide to go to their annual plans.
However, they also allow you to go with monthly plan if you prefer that.
The price is almost doubled but I really admire the hosting providers that allow monthly plans.
I say this because there are actually a lot of hosting providers out there who would require you to pay 12 months in advance before you could start using them.
Starting in a monthly plan means that you could start working on your website immediately with just a few bucks.
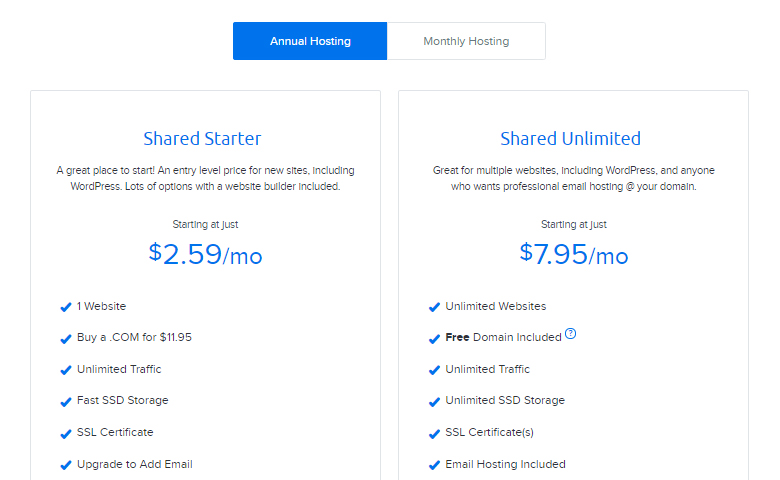
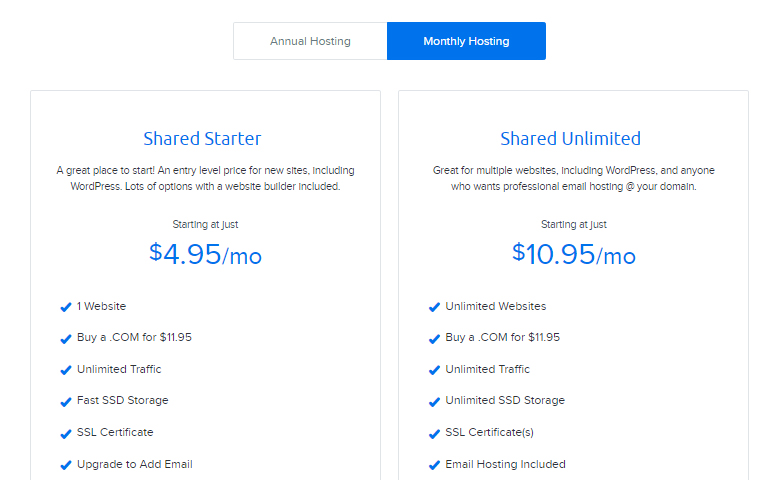
Here is the breakdown of their plans:
Shared Starter
- Annual Price – $2.59/mo
- Monthly Price – $4.95/mo
- 1 Website
- Unlimited Traffic
- Fast SSD Storage
- SSL Certificate
Shared Unlimited
- Annual Price – $7.95/mo
- Monthly Price – $10.95/mo
- Unlimited Website
- Unlimited Traffic
- Unlimited SSD Storage
- SSL Certificates
- Emal Hosting Included
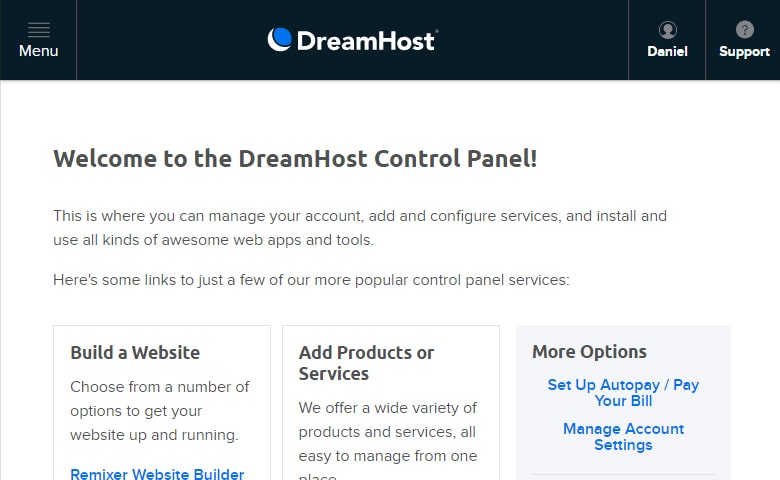
2. Purchase Experience
The purchase experience with DreamHost is very pleasant and straightforward.
You just need to choose your plan, signup, enter your billing details and complete the purchase.
Almost immediately after that, you will receive multiple emails from DreamHost containing your login credentials.
This experience is very important for me because I have encountered hosting providers before that are far from this.
Basically after I paid them for the hosting and domain the first email I get from them is an email asking me to send them my IDs.
I sent it to them immediately and they didn’t reply for hours!
I am very happy to say that DreamHost is not like one of these hosting.
3. Control Panel
Now this is where I kind of get disappointed with DreamHost.
Basically they are not using your regular cPanel platform from this company.
So if you are like me who is used to this kind of control panel. Then you might feel like you are in an unfamiliar environment at first.
However I found more limitations on their control panel which just made my heart sank.
First is I needed to search Google first to find out if they have a File Manager as I cannot find this link in their control panel.
Alas I found the link to their File Manager, but I cannot log-in! I doubled and tripled check and made sure that the credentials I am using are all correct.
Their File Manager is also different, it is called WebFTP. It can be found under your domain name in the Domains section.
Through further tinkering in their control panel, I found a settings that has a checkbox for Disallow FTP which I then unchecked.
I am still wondering why that option is checked by default. In my opinion that should be unchecked by default.
Finally I am able to log-in to their File Manager but then again I am hit with a roadblock!
Basically, you cannot show hidden files in their File Manager. So this means that you cannot open or edit dot folders and dot files.
These are just the first things I noticed but you yourself might find more limitations in their custom control panel.
One good thing that I really admire though is that DreamHost integrated the Let’s Encrypt SSL to their system.
This means that you can get a free SSL directly from DreamHost and they will also install it automatically to the domain of your choice.
4. Preparing the Website
The next step is I worked on preparing the website for the most important part of this review.
The various performance test.
This review website is using the default Twenty Seventeen theme. Which I customized a bit so the homepage will look like an ordinary blog website.
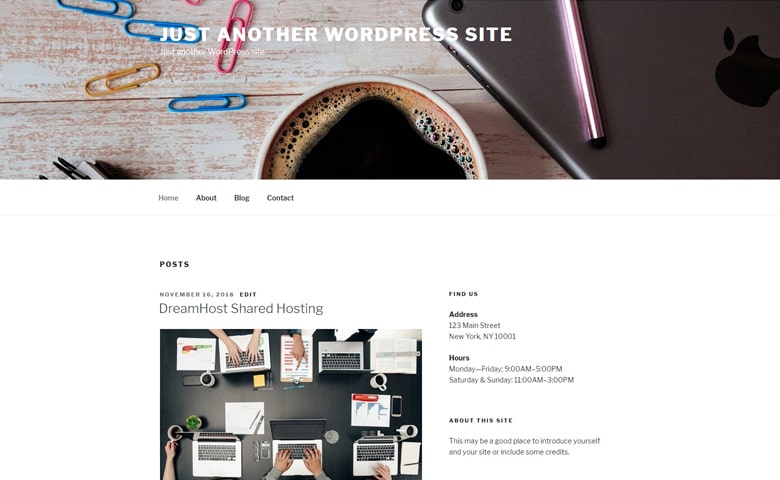
Basically I changed the header to a full-width image with a 1920 x 360 pixels dimensions.
I also added two new posts with featured images that show on the homepage.
Those posts featured images has dimensions of 780 x 480 pixels.
There are some minor CSS codes needed to attain this appearance but they are not a lot.
The next step is to cleanup the plugins. If you use the DreamHost installer to install WordPress. Then you would see that it comes with some plugins pre-installed.
We do not need those plugins in this review so I removed them. I see that it comes with Super Cache plugin pre-installed but I prefer to use another set of optimization plugins.
After cleaning up the plugins, I then installed the Autoptimize and Cache Enabler plugins then set them up.
I basically enabled the JS and CSS minification settings. I also enabled caching setting.
5. Performance
Finally we are in the most important part of this DreamHost in-depth review of their Shared Hosting plan.
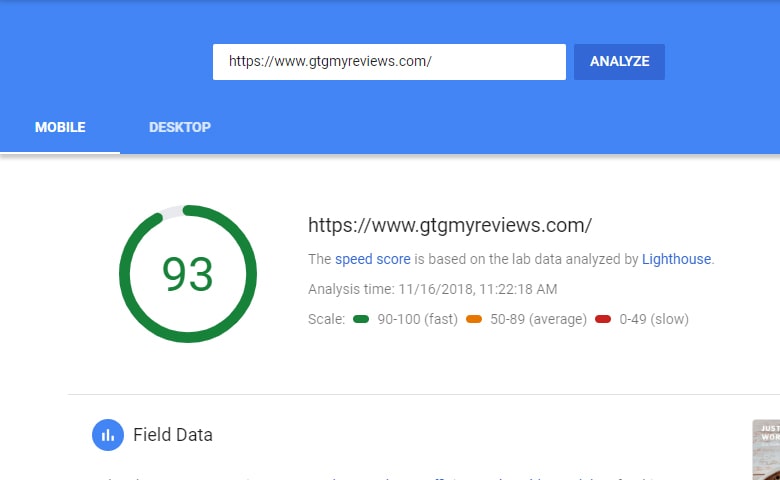
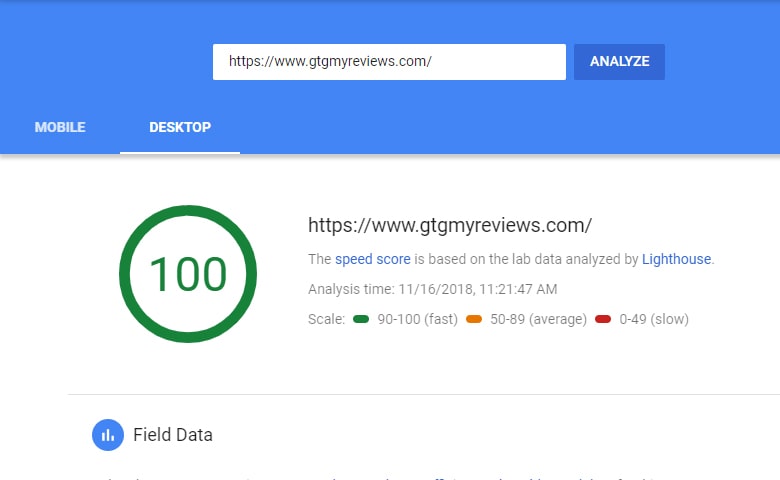
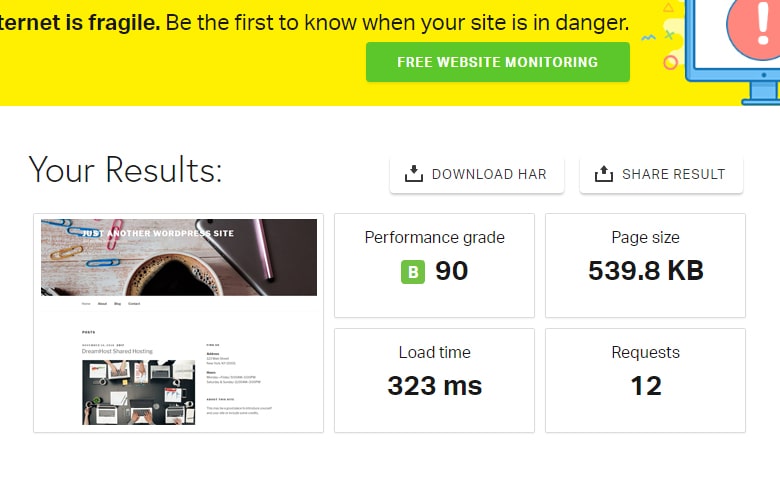
Basically I ran the Google PageSpeed Insights, Pingdom Tools and Bitcatcha speed tests.
Here are the screenshots of the results.
Google PageSpeed Insight – Mobile
Google PageSpeed Insight – Desktop
Pingdom Tools
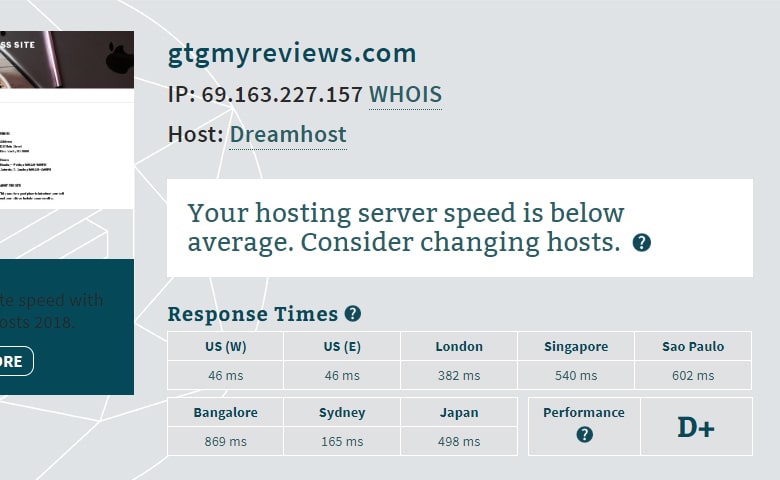
Bitcatcha
These are indeed some pretty good numbers for a Shared Hosting even with a large full-width image.
I did not even go all out on the optimization as there are still a few doors open in that aspect.
You could still add a CDN or buy a premium DNS for further optimizations. The Google PageSpeed Insights also still has some suggestions you could work on.
Also looking at the Bitcatcha results, visitors from foreign countries are going to have a longer time waiting before the page starts to load. This is because their latency is higher.
On the other hand, US residence visitors are gonna have a breeze browsing your website.
Conclusion
If you are just starting your blog and will not have a lot a traffic yet. Then the DreamHost Shared Hosting plan is not a bad idea at all.
Just keep in mind that this is still a Shared Hosting so this mean that if another website in your server misbehaves. Then your website’s performance will be affected.
These results are very close to my HostGator in-depth review results as well.
With these results, there is no doubt that DreamHost is a good idea for a starter blog.
However keep in mind that they are using a different control panel which has some limitations.
The Shared Hosting has really come a long way now in 2018. If we are still in 2016, I doubt we would be getting the same results.
These results are mainly because of the progress in processors technology. Also another contributor is that more and more hosting providers are now upgrading to fast SSD storage.
Once you start working on your blog, you might want to try installing my recommended WordPress plugins.